Donate-large

If you like this blog, please make a little donation.

It's a secure process, and with your generosity I will be able to review more hardware and software.

Just click the "Donate" button below and follow the easy instructions, and I will thank you eternally.

Showing posts with label virtualization. Show all posts

Tuesday, July 26, 2011

Virtualizing Lion with VMWare Fusion

Long ago when Leopard was launched, the end-user license agreement allowed Leopard Server to be virtualized. Same applied for Snow Leopard Server.

However now with Lion's launch, things have changed:

(iii) to install, use and run up to two (2) additional copies or instances of the Apple Software within virtual operating system environments on each Mac Computer you own or control that is already running the Apple Software.

As extracted from Mac OS X 10.7 end-user license agreement, that you can read here.

So now, beside that legal sentence is the meaning that you can run up to a maximum of three copies of Mac OS X Lion, one running real on bare hardware and two running inside a virtual machine.

VMWare Fusion added support to Mac OS X Server as a guest with Leopard Server, however it still has added no official support for Lion.

In this guide I'll explain you how to install it correctly.

Fusion 2  dragged

First of all you need to be sure you have the lastest version (3.1.3 as of this writing) installed. You can get it here.

I have tested this on both Snow Leopard and Lion hosts.

Second of all you need the Lion Emergency Startup Disk, in image, USB or burnt (you can see where it is, called InstallESD.dmg, here).

Third of all we'll create an installer image, so go to Utilities (Cmd+Shift+U on Finder), open Disk Utility and create a new image with the following parameters:

Screen shot 2011 07 26 at 1 30 36 AM

Now insert or mount Lion ESD. We need now to go to the Terminal (open it in Utilities) and start with command:

hdiutil mount "/Volumes/Mac OS X Install ESD/BaseSystem.dmg"

Now a new drive will appear mounted, called "Mac OS X Base System" and we return to disk utility to copy this volume to the disk image we created earlier.

Screen shot 2011 07 26 at 1 35 49 AM

Be sure to have marked "Erase destination". After a couple of minutes we will have two disks called "Mac OS X Base System", that should be unmounted. Then double click the LionVMInstaller.cdr image and go to Terminal.

First we will copy the kernel cache from ESD to our installer image:

sudo cp /Volumes/Mac\ OS\ X\ Install\ ESD/kernelcache /Volumes/Mac\ OS\ X\ Base\ System/

And now we instruct the prepared image to use it, editing boot parameters, using nano, a text editor in Terminal:

sudo nano /Volumes/Mac\ OS\ X\ Base\ System/Library/Preferences/SystemConfiguration/com.apple.Boot.plist

And we write

<key>Kernel Cache</key> 
<string>\kernelcache</string>


Just before </dict> so it ends like this:

Screen shot 2011 07 26 at 1 43 11 AM

Now with pressing Ctrl+X keys it will ask to save, we press Y as in Yes and it's done.

Next step is copying installation packages from the ESD to the prepared image with the following two commands:

sudo rm /Volumes/Mac\ OS\ X\ Base\ System/System/Installation/Packages/

sudo cp -Rv "/Volumes/Mac OS X Install ESD/Packages" "/Volumes/Mac OS X Base System/System/Installation/Packages"

And now we create a file to make VMWare Fusion think this disk comes from a Server version, as it will expect.

sudo touch "/Volumes/Mac OS X Base System/System/Library/CoreServices/ServerVersion.plist"

And enough of the terminal for now. We unmount everything, start VMWare Fusion and create a new virtual machine.

We choose LionVMInstaller.cdr as the image to install from, and in case it does not detect it's Mac OS X, we choose as operating system "Apple Mac OS X" and as version "Mac OS X Server 10.6 64-bit".

Be sure to customize settings, then it will ask for the name. I named it "Mac OS X 10.7 Lion". Now choose Hard Disks and uncheck "Split into 2 Gb files" and Apply.

Go to Processors & RAM and put at least 2048 Mb and as more as you want and can.

Boot it.

It will crash, this is expected. For some reason the NVRAM values VMWare writes by default don't allow Lion to boot. Download a prepared NVRAM here.

In VMWare right click the virtual machine, "Show in Finder", right click it, "Show Package Contents", and replace the NVRAM file there with the one you just downloaded.

Screen shot 2011 07 26 at 1 59 35 AM

Go to VMWare Fusion and boot it again.

Screen shot 2011 07 26 at 1 56 21 AM

Now follow the installation instructions. When it finishes and reboots VMWare will complain it's not a server version, it's ok.

Reboot the virtual machine and as soon as the vmware logo appears in grey press the ESC key FAST!.

A menu will appear, and here we will choose "Boot Manager", that will present us with a list of detected boot devices, mostly the HDD and the prepared image.

Screen shot 2011 07 26 at 2 03 39 AM

Taking note that the first item "Mac OS X" contains the device path of the hard disk, we choose the "EFI SCSI Device" were PCI number or SCSI numbers changed (most probably, "EFI SCSI Device 1").

It will boot the installer again, but this time we will enter on Terminal. Utilities -> Terminal. Now here we write:

touch "/Volumes/Macintosh HD/System/Library/CoreServices/ServerVersion.plist"

IMPORTANT EDIT NOTICE: Some updates, specially Java runtime, will crash if you did this step. Doing this other one will solve it, and can be done in an already installed Lion VM:

sudo cp "/Volumes/Macintosh HD/System/Library/CoreServices/SystemVersion.plist" "/Volumes/Macintosh HD/System/Library/CoreServices/ServerVersion.plist"

When done, Apple menu -> Restart.

Screen shot 2011 07 26 at 2 11 25 AM

Now, enjoy it!!!

Monday, May 2, 2011

Windows 8 Milestone 2 (build 7955)

Games have returned, the beta people did not forget them this time!!!! *plays to Mineswepper and never writes the article*

Ok stop kidding, let's be serious.

I started the installation on VMWare Fusion, as usual. The installation went really fast, faster than Milestone 1, indeed taking only 15 minutes to finish the first phase.

But when the second phase was to start....

win8m2-1

STOP 0x0000005C, or "unable to load HAL". Changing the advanced configuration (use VT-X, do not use it), no way.

Time to try another virtualization solution, like the free to use VirtualBox. Here the first phase of the installation took a little longer, but still less than 20 minutes.

In this milestone they changed some of the "Windows 7" strings to "Microsoft Confidential", but most of the system still refers to "Windows 7".

They also changed the background including a crossword that I will not resolve :p

win8m2-2

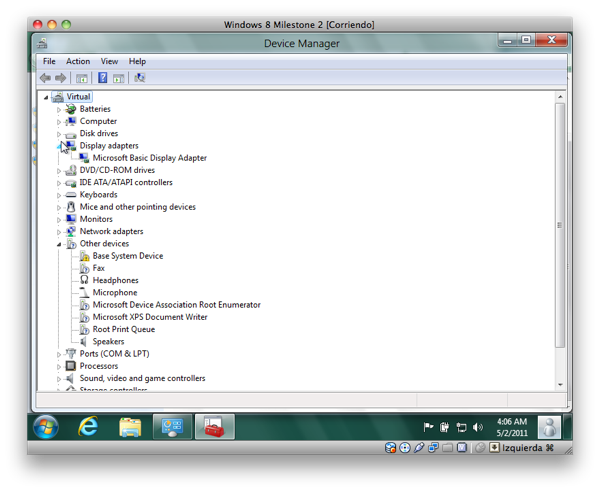
Aero is working without any driver for the VirtualBox 3D acceleration, and the strange device that appeared in Milestone 1 has disappeared.

win8m2-3

The only easily visible new features are SmartScreen and History Vault.

win8m2-3

"History Vault" is a new backup feature that pretends to imitate Apple's Time Machine.
It does not work with target drives if they contain Libraries (a function introduced with Windows 7 that mixes the content of multiple folders in a single view), and the current implementation does not offer any configuration option other than choosing the target drive.

I've been unable to see the recovery interface that shows a timeline similar to Time Machine.

win8m2-4

SmartScreen is the anti-phishing for downloaded files. It checks every executable program you download against a Microsoft database to see if the software is known and secure.

As you can see on the screenshot when it finds an unknown executable the only easy options (and recommended ones) are to not run the program, or delete it. The option to continue is hidden under "More information" and even then, it's the less visible option.

For my experience with customers this means that, unless Microsoft checks the millions of applications that exists for Windows (I doubt they will do ever) most people will click don't run or delete and then complain to the developers why their program is not installing.

Microsoft just tried to copy this feature from Mac OS X, but got it the bad way, as on Mac OS X the question is simpler and the "Run" option is as easy to choose as the "Don't run" one. Really annoying that this will happen so common, that as soon as users learn to disable it, won't doubt on forgetting that dialog for the sake of usability.

The rest of the new Windows 8 features are disabled by default and require enabling some registry entries to access them. You can also download NoPill, a little application that enable them all.

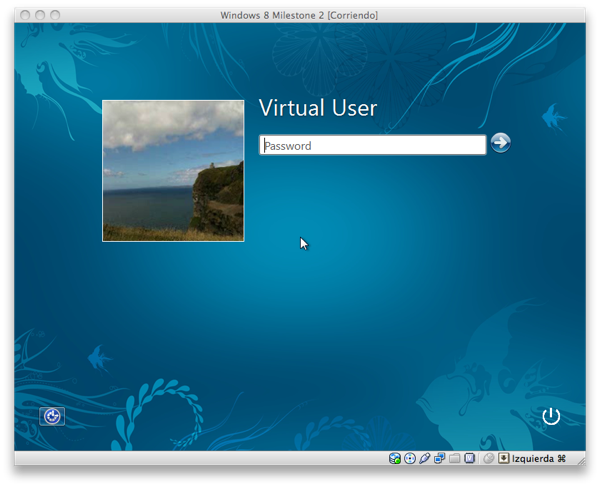
Metro Login screen and Lock screen

win8m2-5

To enable this feature you must go to Control Panel -> User Accounts -> Enable Touch Access.

This new screens are oriented to tablets and touchscreens, and offer a new option for login. Instead of putting a password you can do a series of gestures unique to your user.

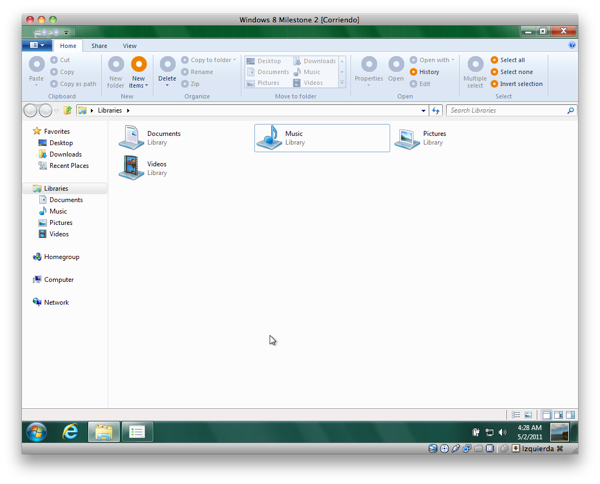
Ribbon interface

win8m2-6

To enable it you must go to the registry editor, to HKEY_CLASSES_ROOT\CLSID, create a new key called {4F12FF5D-D319-4A79-8380-9CC80384DC08}, insert a new string value named AppID and containing {9198DA45-C7D5-4EFF-A726-78FC547DFF53}.

Then on opening a new Explorer window you'll see the Ribbon interface, as it's already familiar in Microsoft Office. Icons are not present, most options are not available, but you see what the idea is.

Icons also change on context, when you're viewing inside a ZIP file you have options to decompress it, when clicking a drive you have drive-related options (defrag, format, so on).

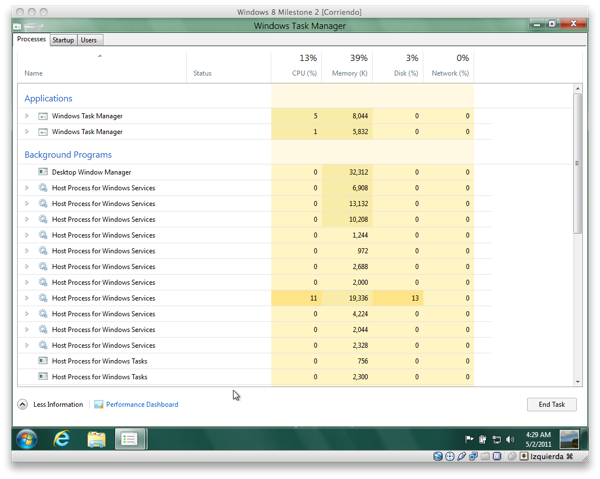
New Windows Task Manager

win8m2-7

Finally, after so many years of serving us, Task Manager retires.

To enable it go to the Registry to HKEY_CURRENT_USER\SOFTWARE\Microsoft\Windows\CurrentVersion\Explorer creating a new DWORD key called RPEnable and setting the value to 1.

This new task manager is prettier and easier to see, showing separate threads, processes, applications, and the most important information. You can also see the new Performance Dashboard

win8m2-8

Or watch processes by user

win8m2-9

MoCam (a new webcam application)

win8m2-9

This new touch-oriented application allows you to record a video, take a snapshot or time a snapshot.

It may be enhanced in the future to include videoconferencing (photocopiers are working, see Apple's FaceTime), but currently they forget the most important touch control of all... EXIT!

I tried it with my integrated webcam (Apple's iSight) but without drivers it did not work. I put a basic USB Video Class webcam (that DOES have drivers, and installed correctly on this Milestone), but MoCam still did not see it.

To enable MoCam you must disable Aero (Ctrl + Shift + F9) and run webcam.exe.

Modern Reader

win8m2-10

Modern Reader is a new and simple PDF reader done in C#. It lacks anything, any kind of control for now, but works with normal PDFs.

To run it you must manually set PDF files to open with C:\Program Files\Microsoft\Windows.glcnd\glcnd.exe.

You must add a registry key for it to work in non-immersive (touch) mode, as the immersive mode is currently very bug-prone.

On HKEY_LOCAL_MACHINE\SOFTWARE\Microsoft\Windows\CurrentVersion\Applets\Paint\Capabilities add a string value called CLSID with value {D3E34B21-9D75-101A-8C3D-00AA001A1652}.

Immersive browser

win8m2-11

The "Immersive Browser" is a touch-based interface made in C# for Internet Explorer. To run it you must disable Aero and run C:\Program Files\Microsoft\Immersive Browser\Microsoft.ImmersiveBrowser\miexplore.exe

Separate boot partition

win8m2-12

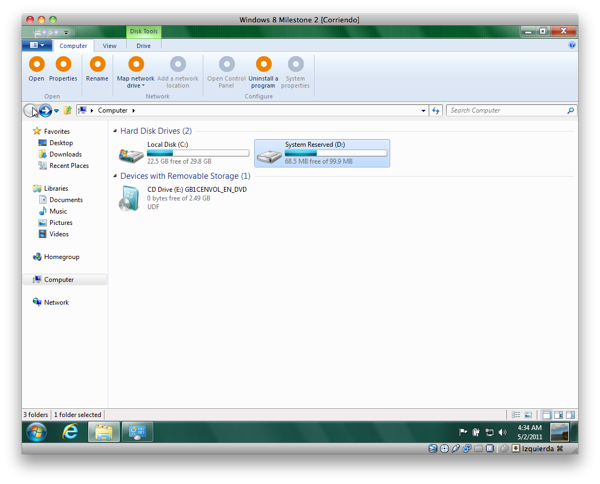
For default Windows 8 Milestone 2 will create two separate partitions, one for boot (called "System Reserved") and one for the system.

The utility of having a secondary partition only for boot is easier to enable BitLocker (drive encryption), but letting it so accessible by users mean that the partition will be used by them, and their viruses, for other purposes.

Conclusion

Windows is receiving a cleaning of face, new interfaces, new ways to do things, but really almost no new features (and none of the new ones are really interesting at all).

It just seems, with MoCam, the Immersive Browser and so on, that they are porting Windows Phone 7 features to Windows 8.

Of course a Milestone means it is unfinished and unpolished, but so were Windows Vista milestones and they promised new things, new features, even if some did not arrive in the end (like WinFS) but for now, there is no real reason to wait for Windows 8 at all.

Saturday, April 30, 2011

Windows 8 Milestone 1 (build 7850)

Having official access to all Microsoft pre-release software can be a quite entertaining thing.

This is time to test the first Milestone of Windows 8. Yes I know that the lastest version is the third Milestone, but things should come in order.

For it I used both VMWare and QEMU.

Windows 8 is still too early in the development, and there is not a long list of new features.

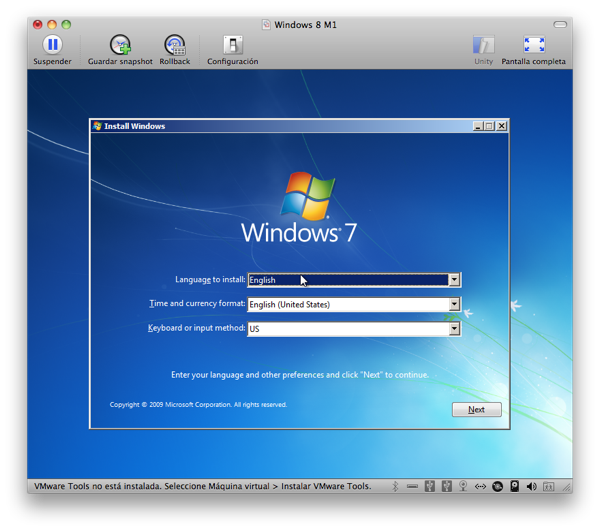
The installation indeed, still shows "Windows 7" images and names everywhere.

win8m1-1

I created a virtual machine of type "Windows 7" with 1 Gb of virtual RAM and 40 Gb of virtual hard disk.

With these configuration, in my laptop and under VMWare, Windows 7 would have took about 4 hours to install. However Windows 8 took about just an hour, counting all installation phases and reboots.

At first boot it automatically started downloading the VMWare's sound card driver without asking.

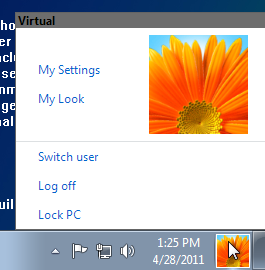
At the rightmost down corner there appears the icon I choose for the user, as a fast access to user-oriented tasks, like user settings, locking the PC, switching users, so on.

win8m1-2

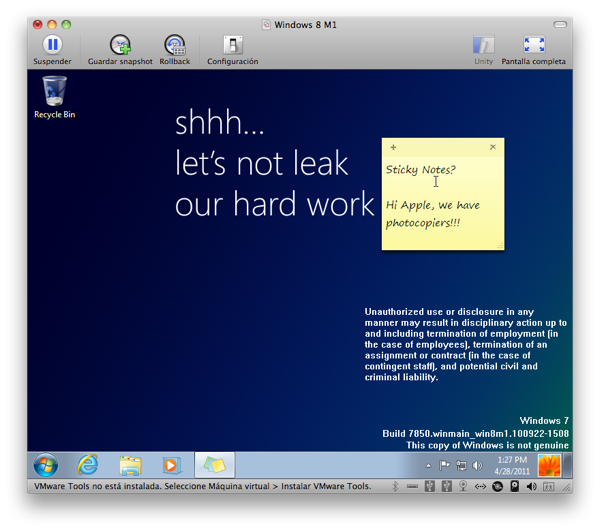
The desktop background also remembers us to not leak that software, with a pretty hard advice.
This made me laugh, because of course, no one cared about that advice, as well as they don't care when introducing as new features the ones they copied from other operating systems.

win8m1-3

Let's make fun of Microsoft :p.

So in the search for any new feature, application, only three things showed up.

win8m1-4

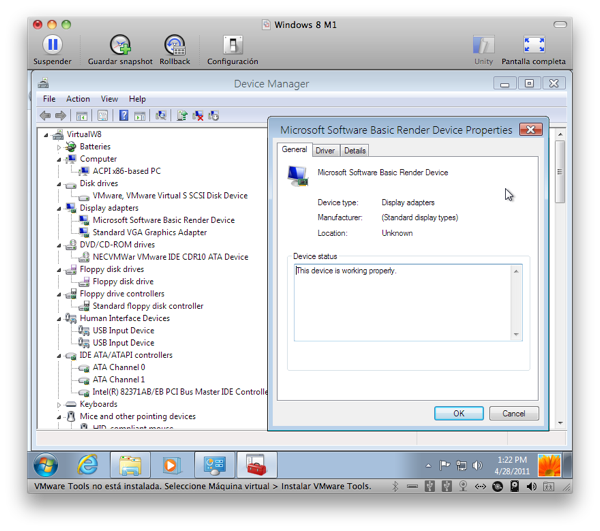
I've never seen that device in any Windows version, I'm not sure what is it about, maybe something for the new UI (not yet introduced in this build) or whatever.

win8m1-5

I'm not sure if this option is in Windows 7 Enterprise, it is not in Windows 7 Ultimate and I've never heard of it so I consider it new unless otherwise stated.

This option allows you to burn a CD or DVD with Windows Preinstallation Environment (the same used for installation) and recovery utilities, like the RAM tester, the filesystem integrity checker, so on.

win8m1-6

And finally, Internet Explorer 9 Beta. While Internet Explorer 9 is on retail now, downloadable for Windows Vista and Windows 7, the version included here is different. I suppose it is separate for evolution to 9.1 with new features introduced by Windows 8 itself.

Appart of that three differences, the Windows PowerShell shell is included in the installation.

The system seemed quite stable, but installing the VMWare Tools just made VMWare Fusion badly crash.

On QEMU, however, the system was unable.

win8m1-7

After 6 hours in that same screen, we can consider the system stuck and QEMU is unable to emulate it.

Stay tuned for Milestone 2 report.

Wednesday, April 20, 2011

OpenIndiana build 148

It's time for hades.claunia.com to get a huge hardware update, five new hard disks, a software RAID configuration. So I though it maybe was time also for an operating system change.

OpenIndiana takes the role where OpenSolaris left it.
OpenSolaris is the opensource version of the old and good Sun's Solaris UNIX variant released on 5th May 2008 with great hype from the community. However when Oracle bought Sun on November 2010, they closed again the source and OpenSolaris was abandoned.

OpenIndiana continues the development of what OpenSolaris started, and sounded like a good choice for an operating system change for hades.claunia.com, so I downloaded the lastest release, build 148, to test it under virtualization.

I started with lastest stable QEMU build, even if in Mac OS X it's not a virtualization package but an emulation one, as I don't care for speed.

Unfortunately some bug on the QEMU emulation prevented OpenIndiana's live environment to load, so I had to move to another virtualization package, in this case VMWare Fusion.

The installation is easy, when you boot from the DVD image you get a live session where you can simply use the system or start an installation.

The installation was easy and not informative at all.

Special to note, in the partitioning tool you cannot chose what filesystem to use, or how many slices to create, just a "Solaris2" option for the partition you want to install OpenIndiana into. This really means to create a ZFS pool with about 8 volumes (/usr, /, swap, /var, so on) in the chosen partition. There is no way to say put "/usr" on another ZFS pool on another partition or disk.

15 minutes later, the system was installed and booted, so time to play with the package manager.

OpenIndiana comes with a good number of packages, all the drivers from OpenSolaris (including binary drivers from ATi and nVidia with 3D support), and almost all the software anyone would need. To note that Mono was absolutely missing from the available packages, as well as any KDE or QT thing.

However no package installed or updated, receiving a message saying that I were in a Live environment. I rebooted a couple of times, but to no luck, no way to install anything or update.
This is fun because when you're running Live on most Linux distributions (like Gentoo or Ubuntu) you can install updates and packages, on RAM and deleted on reboot, but you can install them.

Also when I tried to eject the installer CD, no luck. From the GUI, from the Terminal, there was absolutely no way to eject the inserted CD image but to instruct VMWare to force the ejection.

OpenIndiana looks very very promising, but it's not yet stable for production. hades.claunia.com will stay on Linux.